Tag Archives: SharePoint Online
Sharing with external users: why doesn’t the user show up in the SharePoint group immediately?
Tips for logging into multiple SharePoint Online environments
Updated 1 March 2014 to include ADFS authentication with Firefox.
I support multiple clients daily with their SharePoint Online environment – plus, our own intranet at Connecta runs on SharePoint Online. SharePoint Online tends to keep your session, which means I’m constantly logging in and out of sites. These are the tips that I’ve collected to help make this a bit easier.
LastPass as a URL and password manager
Anyone who uses the internet has multiple passwords: email, Facebook, etc. At least, they shouldn’t all be the same password. Add in clients, who often tend to give me multiple users to work with (i.e. an admin user and a normal user, plus maybe a different Active Directory user) and it becomes difficult to keep track of these passwords. I could save them in OneNote, but that isn’t particularly secure – nor does it lend a professional impression to your clients. Conclusion: some sort of password management is necessary.
I used to use Keepass, synced between multiple computers by saving the database file in Dropbox. It’s a great, simple little tool that runs on plenty of platforms and is secure. I could save usernames, passwords, URLs and have it remind me when a password was about to expire. I fell in love with the search functionality – why remember what folder something was in when I could search? When I left one of my last jobs, I simply exported the Keepass database related to work and gave it to IT support. I had some issues getting it to integrate into the browser, though, so eventually went looking for a different solution.
A few years ago, I switched to LastPass and haven’t looked back since. LastPass is a cloud based service which allows you to save your passwords. It supports two-step authentication and a bunch of other methods which are enough to make me feel that my (and my clients’!) passwords are safe. There are good plugins for Internet Explorer and Google Chrome, as well as an Android app. I keep everything in here: the only passwords I still manually type have are my Active Directory account for work and the LastPass master password.
Some of the reasons I love LastPass:
- It generates all of my passwords for me. It’s fast, it’s easy and it helps keep my accounts secure. I usually have it set to 10 characters and allow special characters, but it’s a question of changing a few check boxes around to get a different type of password, depending on the requirements.
- It works on all the different platforms I use: Internet Explorer, Chrome, Android, etc.
- As cloud solution, it keeps my passwords synced between all of my devices – I can access the latest version from anywhere.
- It can handle ADFS authentication (in select browsers).
My only gripe with LastPass is actually with Google Chrome on Android – Chrome doesn’t allow plugins and therefore we can’t use LastPass to auto-fill passwords in that browser. However, I do quite like the Dolphin browser, so it’s all good.
I keep all of my client passwords in LastPass. Since SharePoint is my specialty a lot of these passwords are for websites. However, they’re often also Active Directory users for remote access, door codes, etc – I might not be able to automatically fill these in, but I always know where they are and that they’re secure.
When I want to open a client’s site, I have a number of options, depending on the browser I’m using:
- Type in the URL from memory – this tends to happen a lot!
- Chrome and IE – open the LastPass vault plugin, search for the client’s name and click on the entry
- Chrome: type “lp” and then “tab” and then start typing the client’s name – it will automatically supply the URL for me
Once I’m there, I’m usually looking at Microsoft’s sign-in page, usually with the username that I used last:
At this point, I choose “Use another account” and then use LastPass to fill in the information for the account I need – either by using the toolbar in Chrome or right-clicking in the form in Internet Explorer:
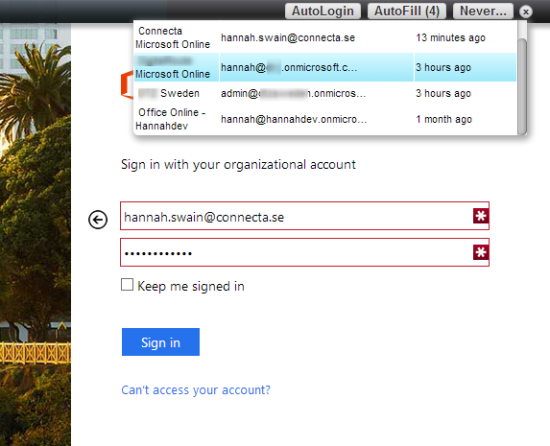
I choose the account I want, the information is automatically filled into the form and I click “Sign in”.
This saves me so much time in the course of a day.
Browser sessions
Sometimes I need to have multiple environments open: a client has an ad hoc issue while I’m actually working on another environment or I need to look something up on our own intranet at the same time. It happens often.
Internet Explorer keeps your session across tabs, so you need to force it to create a new session. To do this, you need to go to File -> New Session – there is no keyboard shortcut that I know of.
This does not always seem to be stable: sometimes the sessions still seem to get mixed up. Also, LastPass does not seem to understand IE sessions.
Use multiple browsers
I don’t use the multiple sessions on IE all that often, simply because I get confused which window belonged to which client.
It can be useful to run one environment in IE and another in Chrome. It makes it obvious which environment belongs to which project that is open and it doesn’t ever get the sessions mixed up.
According to Microsoft’s browser support page for SharePoint Online, Google Chrome, Mozilla Firefox and Opera are all supported. I have noticed some issues with things like dragging webparts and Open in Explorer, though.
My best tip: remember which browser you’re using to save yourself testing headache – like the day I couldn’t figure out why Open in Explorer wouldn’t work, then realized I was using Chrome.
ADFS authentication
According to Mats Sørensen’s blog post “How Does ADFS Work With Office 365?“:
You might know something about Microsoft Active Directory Federation Service (AD FS) or maybe not, but basically it’s a Microsoft feature that enables SSO (Single Sign-On) between two domains/forest without using a normal domain trust relationship as many people might know it.
For those of us who do not configure these kinds of things, ADFS is when the Office 365 login screen sends you on to another authentication provider and pops up a dialogue to allow you to login (again):
Note that you can also select multiple usernames, which is great when you’re testing multiple users or permissions.
When working with SharePoint environments which use ADFS authentication, use Firefox if you want to use LastPass to authenticate! I now use Firefox a lot of the time when facing this authentication.
Conclusions
These are the methods I use to help make it easier to maintain multiple environments.
If you have any tips, please share them in the comments!
Lessons learned: branding SharePoint 2013 team sites
I was asked to do a simple branding for a client as part of a SharePoint Online/2013 project. I jumped into it thinking it would be like the difference between MOSS 2007 and SharePoint 2010 – some small changes, but generally the same. It wasn’t – though there are some neat new things.
Background
The premise for this project was fairly simple: the client needed a central administration site with sub-sites for each project.
The biggest caveat on this project was that the project sites would be created from a SharePoint site template (“save site as template”), which is notoriously complicated combined with team sites and branding.
Change the look
There are a few ways to change the design package or “look” in SharePoint 2013.
This brings you into a screen where you can choose from a number of default Looks or edit your current Look:
When you choose a look, you end up on the configuration screen for that Look where you can change the background image, the colors (theme/color palette), site layout (master page) or fonts (font scheme). You can see a live update in the middle of the screen:
This is great for end-users: it allows them to have far more control over their environment and to customise things to fit their own needs. It allows the users to use pieces of a branding solution. It also allows branders to supply them with better options, i.e. by creating color palettes which the end users can then choose.
Composed looks
The “Change the look” allows the user to select a premade template and then change the options that create the look. You can also create a Composed look for your environment that includes all of the elements. The user can select it and then have everything automatically look correct.
You can find the Composed looks on each site settings, under Web Designer Galleries:
Composed looks is nothing more than a list with a number of different columns which point to different resources. If you edit an item in the list, you will be able to edit all of these different properties:
Creating a new Composed Look is easy; simply create a new item in this list.
Note: the master page must be created via a HTML page, even if you don’t make any changes to it, before it will be available in a Composed Look. You will not be able to select the master page as a layout option in the Change the Look screen otherwise.
Composed Look elements
SharePoint 2013 has a number of design elements which are combined in the Composed Look:
Element | Description | Lessons learned | |
(HTML page) | SharePoint 2013 creates master pages from HTML templates | Make all of your changes here, if possible | |
Master page | Created from the HTML – try and avoid editing the master page directly in SharePoint 2013 | Is automatically created from the HTML page as soon as there is a new version of the HTML page | |
Theme | Also called color palette, is responsible for colors | Download a pre-existing template and update as needed. Choose one main color to replace, then replace it with “replace” in an editor – this will keep the coloring consistent. Just changing one color was enough to make a big impact for my client. | |
Background image | Used for the background image on pages, automatically repeats | SharePoint assigns CSS transparency of 85% to this image – make sure that it is fairly dark, otherwise, you will not be able to see it | |
Font scheme | Helps to control all the different fonts in the environment |
I was very impressed with how easy it was to update things like the color palette – you need some basic branding knowledge and an understanding of check-in/check-out. That’s it, and changing these things can make your environment look very differently.
Branding inheritance with team sites
I really wanted to reuse the same master page on each of the different team sites; I had put the Open in Explorer link from my Using the “Open in Explorer” link on SharePoint 2013 mini project right about the left menu.
Here’s what I learned while trying to accomplish that:
- Edit the HTML master file for the layout, not the master page. If you only edit the master page, for some reason it is impossible to select this master page as a layout in Change the Look. Plus, there is no reason not to – SharePoint updates the master page with the changes in the HTML on the fly.
- Master pages are not shared over different sites (without the publishing feature) – the master page that I created for the client was not available on one of their project sites. I also edited one of the default master pages – the change was not visible on a subsite. This means that the master page changes are limited to a site scope, not site collection.
- Color palettes are available over different sites. I did not test font palettes.
- If you save a site as a template, the same Look is applied to the new sites created from that template. In my project, this meant that the color palette and the background are automatically applied to new sites.
Resources
Benjamin Niaulin: Step by Step: Create a SharePoint 2013 Composed Look
Using the “Open in Explorer” link on SharePoint 2013
A client recently had the request to add the “Open in Explorer” link for a specific document library on a site. It’s understandable, considering that finding the Open in Explorer link requires understanding of the ribbon and knowing where to look for it; this site would be targeted at users with minimal SharePoint knowledge.
Browser considerations
Microsoft says that IE 7+ is required to use Open in Explorer. However, Microsoft also says that only IE 8+ is supported for SharePoint Online. Your mileage may vary.
I tested it in Chrome, which did not work. I have heard rumors that it works in Firefox, but that sounds unlikely to me, considering it is tapping into Windows functionality.
Troubleshooting Open in Explorer functionality
The functionality seems to be a bit sensitive and the conditions need to be just right for it to work.
Note #1: “Open with Explorer” may not work if you have the 64-bit version Internet Explorer and/or the 64-bit version of Microsoft Office installed.
Note #2: There are some issues with IE 10 and this functionality; I got it working with IE10 (32-bit) with the “keep me signed in” trick – see below for more information.
Typical error messages:
- “Your client does not support opening this list with Windows Explorer.”
- “We’re having a problem opening this location in File Explorer. Add this web site to your Trusted Sites list and try again.”
Solutions:
- Ensure that the WebClient service is started (this is preconfigured on modern versions of Windows)
- Ensure that you are using a supported browser (IE 8+)
- Add “https://*.sharepoint.com” to Local intranet site or trusted zones in your IE settings
- Sign in to the SharePoint Online site by using your Office 365 credentials, and make sure that you click to select the Keep me signed in check box.
Creating the link
The Open in Explorer link in the ribbon is nothing more than JavaScript. We can quite easily build our own.
The basic format is as follows, for the URL https://example.sharepoint.com/template/Shared Documents/:
<a onclick="NavigateHttpFolder('https:\u002f\u002example.sharepoint.com\u002ftemplate\u002fShared\u0020Documents', 'blank');" href="#">Open in Explorer</a>
The NavigateHttpFolder function resides in the core.js file and is usually called automatically. It was a non-issue on SharePoint Online with (mostly) default branding.
Note that you need a \u002f for a backslash, and a \u0020 for a space.
In my example further on, I’ve made the link relative – it works both ways.
Making the link dynamic
The thing is, the cilent wanted a link that could be used on a site template for different projects. Each project has its own Shared Documents library, which I want to link to without having to change URL by hand. This is where I started to make it a little bit prettier:
<br /><script type="text/javascript">// <![CDATA[ var CurrentSiteURL = document.location.pathname.split("/").slice(1,2).toString(); var ExplorerViewURL = "\u002f"+CurrentSiteURL+"\u002fShared\u0020Documents"; var LinkText = "Open Shared Documents in Explorer View" // ]]></script><br /><br /><a onclick="NavigateHttpFolder(ExplorerViewURL, 'blank');" href="#"><br /><script type="text/javascript">// <![CDATA[ document.write(LinkText); // ]]></script></a> <br /><br />
I knew that the client would never have more than one level of project sites, i.e. a root site with underlying project sites. So, I grabbed the current URL, split it into an array based on where the forward slashes are and then just grabbed the site information, i.e. “template” from my previous example.
I used the CurrentSiteURL variable to build the URL for the document library. It made sense to make it relative, in case the base URL ever changes.
I put the link text into the variable LinkText, just to make it look nice when building the actual HTML link. It would also allow for a potential dynamic link text.
Link placement/usage
The client also wanted this Open in Explorer link in the quick launch navigation. When I tried this on SharePoint Online/SharePoint 2013, I got a nice error:
It turns out that there’s new security in the newer versions of SharePoint and you can’t add JavaScript to the menu anymore. At least, not without using real code, features and stuff that was beyond the scope of this project.
So I did the following:
- Put the entire script into OpenInExplorer.js in the Style Library, including the HTML
- Place a content editor webpart (CEWP) on the page and call the JavaScript via the webpart.
- Clean up the webpart settings a bit, i.e. Title = “Open in Explorer”, no visible Chrome, etc.
- Export the webpart and then import it via the webpart gallery so that the client can reuse it as often as they want.
Full code in OpenInExplorer.js
<script type="text/javascript"> <!-- Created by Hannah Swain, April 2013 https://sharepointhannah.wordpress.com http://wp.me/p3pUZD-G --> var CurrentSiteURL = document.location.pathname.split("/").slice(1,2).toString(); var ExplorerViewURL = "\u002f"+CurrentSiteURL+"\u002fShared\u0020Documents"; var LinkText = "Open Shared Documents in Explorer View" </script> <a onclick="NavigateHttpFolder(ExplorerViewURL, 'blank');" href="#"> <img style="height: 24px; width: 24px; border: 0px; padding-right: 5px;" alt="Open in Explorer" src="/Style Library/client/folder_yellow_explorer.png" /> <script type="text/javascript">document.write(LinkText);</script ></a> <span style="padding-left: 34px; font-style: italic;">Requires Internet Explorer 7.0+ and Active-X controls</span>
Credits
The following articles/forum threads helped me to figure this out:
ItemStyle issues after SharePoint 2013 upgrade (?)
I have a client who is running SharePoint Online, the 2010 version. She sent me an email saying “Help! None of our content query webparts work!” I took a quick look and it was that standard error that the CQWP cannot be displayed. I thought that maybe someone had messed with the ItemStyle.xsl – that’s usually the first place to start troubleshooting.
I tried to log into the environment using SharePoint Designer 2010, considering that’s what I’d always used for this client. She hadn’t gotten the upgrade email from Microsoft yet, but it turned out that I suddenly needed SharePoint Designer 2013 to log in.
That ItemStyle.xsl that I thought had been messed with? It hadn’t been touched in six weeks and the last person to do anything with it was me.
I traced the issue to a section that was being used to aggregate blog posts within the environment. There turned out to be two issues: the strip HTML template I was using was throwing errors and a variable wasn’t working properly.
@Body variable
I saved the template problem for later and tried to figure out why I suddenly wasn’t actually getting any input from the @Body tag.
I made sure “Body” was actually filled into the slot in the CQWP – it was.
I checked to make sure the field really was named “Body” by checking the URL – it was.
I defined it in the XSL so I could call $Body instead of @Body but that didn’t help.
Finally, I used Heather Solomon’s snippet to see which variables were actually being passed to the CQWP:
<xsl:for-each select="@*"> P:<xsl:value-of select="name()" /> </xsl:for-each>
It turned out that it suddenly Body was called body. That makes a difference in XSLT. I replaced @Body with @body and suddenly I had data to work with again.
Remove HTML template
I finally traced the issue to a template I was using to strip the HTML from the Body field. I had used Ben Prins’ Remove HTML markup in Content Query Web Part, which had worked fine – until it suddenly didn’t.
I replaced the “removeMarkup” template with the one from Maulik Dhorajia’s Removing HTML tags using XSLT. And suddenly it all worked.
I went through the code of the two templates and I can’t really see much of a difference – it seems to come down to the order and structure of how things are called in the code. Then again, I’m not really a developer.
Lessons learned
- I think Microsoft has done some underwater upgrades to some SharePoint Online environments which suddenly require the use of SharePoint Designer 2013
- There must be some differences in the XSLT rendering between SharePoint 2010 and SharePoint 2013
SharePoint and the disappearing webparts
I have noticed something odd with placing list view webparts: they disappear at odd times. I place them on the page and do something such as editing the webpart, etc. and then they’re just suddenly gone. I’ve seen this on SharePoint 2013 as well as SharePoint 2010/2013 Online, with IE9, IE10 and Chrome.
When I go to re-add the webpart to the page, I suddenly get “Wiki [2]” as a webpart title, which means that the webparts aren’t completely disappearing – they’re still there, somewhere.
By going to the webpart maintenance page (add ?contents=1) to the end of the URL), I can see that the webparts is open on the page. But… I can’t see it.
I found Jennifer Mason’s blog on SharePoint 2010, Office365: Why does my web part randomly disappear?!? which also looks at the webpart maintenance page. She has a really good tip: close the webpart via the maintenance page, then re-add it to the page via Add Webpart -> Closed webparts. Voilá – it was back on the page.
However, the webpart disappeared as soon as I tried to save the page. It even disappeared when I hit “Edit Webpart” – I had the edit webpart dialogue but no webpart.
I started checking the HTML source of the zones, to see if the webpart code changed at all to cause this issue. Long story short – the problem doesn’t seem to be there.
At one point, since I was working with simple wiki pages, I edited the webpart without editing the page first. And suddenly it all worked perfectly.
So, when you’re bashing your head against the wall or are just very tired of configuring list webparts that won’t hang around, do the following:
- Add the webpart(s) to the page.
- Save the page
- Edit the webparts without editing the page first