
Occasionally clients ask me to remove the ribbon from their SharePoint environment. Technically speaking, it’s not hard to do – but there are many good reasons to keep the ribbon in place.

Occasionally clients ask me to remove the ribbon from their SharePoint environment. Technically speaking, it’s not hard to do – but there are many good reasons to keep the ribbon in place.

As a project manager, I often need a clean, professional way of showing a client what a project looks like via a Gantt chart or timeline, usually in a PowerPoint presentation. Often times, the information needs to be high level, too – so there’s nothing wrong with having a separate tool just for presenting this information. Sometimes you just want to impress your clients with more than technical knowledge, right? I believe presentations should be useful and shiny.

When sharing with an external user, the user does not immediately appear in the permissions group. It turns out that the user needs to accept the invitation first.
SharePoint permission configuration is one of the hardest things for end-users to understand. Sometimes it is easier to explain a specific scenario instead of how the entire permissions concept works.
This article will explain the following scenario:
This scenario would work in exactly the same way if this was a project site.
To start off, we’ll assume that the DW&C department has already created a standard team site.

Our scenario team site has now been updated to have an extra Management Documents library and a calendar.

When creating this site, we created new permissions, which means that SharePoint automatically created the following groups with the following permissions:
| Group | Permission level | Users | Explanation |
|---|---|---|---|
| DW&C Site Visitors | Read | All users | On an intranet, it’s best to give as much read access as possible to ensure transparency and findability. |
| DW&C Site Members | Contribute | All DW&C users | All users in the department should have the ability to influence the information on their department site. |
| DW&C Site Owners | Full control | Owners/admins | Choose a few users to manage the site, i.e. super users. |
Note: some people suggest adding the department’s manager to the Owners group – after all, they are responsible for the department. However, managers should generally be added to the Members group. Specific users should be chosen to manage the site and be added to the Owners group. The managers will get extra access to their specific documents later in this scenario.
In the starting scenario, the users in these groups have access to all of the content on this team site as nothing specific has been configured.
SharePoint objects, i.e. sites, lists, libraries, folders and items, inherit permission from their parent item.
This means that all users also have access to that Management Documents library, which should be kept separate just for DW&C’s management team. To configure that, we will need to set up a new user group.
In SharePoint, it is possible to assign permissions in three ways:
The first two options are fine, in most cases. However, option #3 should generally be avoided. It is much better to create a group and assign permissions to the group rather than assign permissions directly to a user. The contents of the group is far easier to maintain rather than going through and changing a specific user’s permissions.
It is possible to directly assign permissions to AD groups, which does have advantages in some environments. However, when working with an intranet team or project site, SharePoint groups are usually the easiest to work with.
To create a new group for a site, do the following:

Note: the new user group will be available for the entire site collection, not just this one site. You should name it accordingly – in this scenario, I will name it “DW&C Site Management” to keep with the current naming convention.
When creating the group, the current user is set as owner. In most cases, this should be set to the site owners group, so that they can maintain the membership of this group.

I suggest giving this group “contribute” permissions.

Once the group has been created, you can add users to the group by clicking “New” and “Add users”. You should be able to select the applicable management users from the Active Directory by typing in their names, emails or user IDs.

For more information on adding users to a group, please see Manage SharePoint groups.
Now we have the DW&C Site Management user group, but we need to change the permissions on the Management Documents library so that only the Management user group has access to it. To do that, we will need to break the permission inheritance on the Management Documents library.

To change the permissions on the Management Documents library, please do the following:


As a final step, you should determine if the DW&C Site Owners group should retain their permissions. Note that one group will need to have “full control”, so either the Owners group will need to stay or the Management group will need to have their permissions upgraded.
Technet: User permissions and permission levels in SharePoint 2013
Technet: User permissions and permission levels in SharePoint 2010
Office support: Manage SharePoint groups
Technet: Best practices for using fine-grained permissions in SharePoint Server 2013

SharePoint permission configuration is one of the hardest things for end-users to understand. Sometimes it is easier to explain a specific scenario instead of how the entire permissions concept works.
I decided to organise a small project by using a SharePoint task list on a Office 365 project site. I figure that if it gets too complicated, I can always just open the entire thing in Microsoft Project.
I realized fairly quickly that seeing week numbers in the list was a valuable thing:
I created a calculated column and used the comments on this page, Group A List by Week Number. I ended up changing the formula a little bit – there are some activities in December and some in January, so I wanted to see the year, as well as the week number for sorting purposes.
My final formula:
=YEAR([Start Date])&"-"&If(Int(([Start Date]-Date(Year([Start Date]);1;1)+(TEXT(Weekday(Date(Year([Start Date]);1;1)-1);"d")))/7)=0;52;Int(([Start Date]-Date(Year([Start Date]);1;1)+(TEXT(Weekday(Date(Year([Start Date]);1;1)-1);"d")))/7))
The final result looks like this:

You can see an error on the third line: that’s because [Start Date] is empty on that line, so the week number could not be correctly calculated. I just wanted to get on with the project planning and not spend more time on the formula.
Once you have the week number in place, you can easily make views like this one, where I grouped by Week and then summed up the total hour estimate:

The formula has the following considerations:
Note: this post is written specifically for SharePoint 2013.
Sometimes it is necessary to add a snippet of code to just one page. Examples could be:
There are technically a number of ways to achieve this:
Option #4 is my favorite for a number of good reasons:
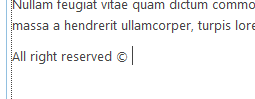
For this example, I will be using a simple JavaScript which shows copyright information, in this case from 2010 to the current year. This allows the copyright to be kept up to date:
<p>All right reserved © <script> var cur = 2010; var year = new Date(); if(cur == year.getFullYear()) year = year.getFullYear(); else year = cur + ' - ' + year.getFullYear(); document.write(year); </script> </p>
You can paste the code directly into the page content.

However, once you save the page and view it, you will see that SharePoint does not realize that it is code it needs to render in some way.
Conclusion: do not place code directly in the page content as it does not work.
In most content editor webparts and all rich text areas, there is a button in the ribbon called “Edit source”. This is great for quick fixes when content has gotten out of hand. In older versions of SharePoint, you could also use it to embed extra code.

You can easily paste your code straight into the Edit HTML window.
However, once you save, SharePoint lets you know that the code that it does not approve of has been stripped.

In this case, some of the embedded code has been stripped out.
Sometimes SharePoint will strip out all of it and sometimes it will only strip out parts which can cause an odd result. When it doubt, check back into the HTML source to see what has happened with your code and if it is still 100% intact.
Conclusion: while this used to work under some older SharePoint versions, it is generally not a reliable solution for SharePoint 2013.
SharePoint 2013 includes an Embed command in the ribbon which can be great for adding code snippets to your page:

After clicking the command, you are prompted to insert your code and given a preview:

SharePoint creates a Script Editor webpart on the page for you. It even includes an “Edit Snippet” button, so you can go back and edit the code later.

The JavaScript is being displayed correctly in the webpart and also on publishing the page.
Conclusion: in my experience, this works but is dependent on the complexity of the code. Test well before using.
I have saved the JavaScript into a file called copyright.html. The file extension can help SharePoint determine how to parse the code when it is called, but you may need to experiment depending on your code – I have had good results from using txt, html and js extensions in the past.
Here is the file in Notepad++:

In this demo, I uploaded the HTML file to the document library on the same site as the page we are working with.

Tip: I tend to use the following rules of thumb as to where to upload these kinds of files:
Next, place a Content Editor Web Part (CEWP) on the page and edit the webpart settings. At the top, add the link to the file and click “Apply” to save the changes.

The content should immediately display in the CEWP on the page.

Tip: if you wish to use the same webpart in many places, you could export the configured CEWP and import it as a custom webpart. You can then place it on a page and it will already be configured for you.
Conclusion: this is my favorite method due to the central storage of the files, ease of editing the files and reusability.
One of my current clients works with the Harmon.ie Outlook addon for copying emails and documents to SharePoint. I believe it is a neat and useful tool which can complement OneDrive for Business.
I recently got a request to allow users to create favorite libraries/sites on SharePoint and have this list be synced with Harmon.ie.
Harmon.ie does not seem to have a way access SharePoint 2013’s “follow” functionality. This may be possible with registry edits or custom code, but I have not found the solution yet.
However, Harmon.ie can sync with the My Links list, which is part of the User Profile Service from SharePoint 2010 and onwards. Libraries can be added to this via the “Connect to Office” button. It is also possible in MOSS 2007.
In SharePoint 2013, new “follow” functionality has been added, allowing users to follow People, Documents, Sites, and #Tags. It is then possible to see updates via the newsfeed on your My Site.

The idea was to allow the client to select which sites they would like to follow, then use that information for two purposes:
The first goal turned out to be fairly easy – once I found out that the “Site” content type on the My Site is not actually searchable. There is a premade REST/jQuery soution available via I Am Following which worked beautifully. The page includes a link to the code download on Codeplex.
The second turned out to be quite a bit harder. I spent a lot of time investigating the Harmonie documentation and tried everything I could find, including using registry edits for site propogation in the Harmon.ie favorites. That site propagation turned out to only work for the enterprise client, not the free client and was really more for prepolating the client with specific sites. I was not able to get the registry edit “SyncFavoritesWithMyLinks” working, as described on Add My Links to the sites and favorites lists.
Conclusion: there is currently no good way to sync the followed content on SharePoint 2013 with Harmonie.
However….
After lots of frustrating, I was rereading the documentation on the Harmonie site and came across the following:
When working with SharePoint 2013/2010, harmon.ie adds the document libraries defined via the SharePoint 2013/2010 ribbon button Connect to Office to your favorites list.
Source: Favorite Locations
My Links is the old bookmarking functionality in SharePoint, used in SharePoint 2007 and 2010. It was replaced by the follow functionality in SharePoint 2013. It requires the User Profile service to be enabled, as it is a per-user list. Clicking the button adds the current library to My Links.
You can access this, exactly as the documentation states, via the Library tab of document libraries:
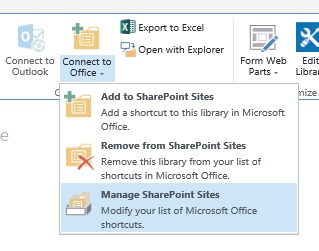
This same functionality is used to create shortcuts in Microsoft Office applications for opening and saving documents.
To make this document library be added to the favorites in your Harmon.ie client, follow these steps:
You can maintain the My Links list by clicking on the dropdown on the Connect to Office button. You’ll see that the list looks pretty much as it did in SharePoint 2007.

Harmon.ie: Favorite locations (in Outlook)
Office Blogs: Following in SharePoint 2013
Thanks go to Wictor Wilén for his tips
I have rarely seen clients use the Reusable Content option. Occasionally it will be used to add a disclaimer to a page – but often that’s best placed in a page layout for a specific page type anyway. There just doesn’t seem to be much of a use for it, though I’ve always wondered if there could be a really useful application.
In a recent project, Daniel Gustafsson found two really cool uses for it: adding a floating image to page content and adding numbered bullet points which are highly styled. These are by far the most interesting uses I have ever seen for the Reusable Content, which is why I asked Daniel if I could share them with you here.
This example is done using SharePoint 2013, but should work for all versions. Be careful with the HTML5 on older versions of SharePoint, though. You will need to add your own CSS.
This article will discuss how to handle an image with float left:

And it will also handle numbered bullet items:

Reusable Content allows end users to save snippets of commonly used text or HTML which can then easily be put onto a page.
All Reusable Content is saved into one list per site collection, always saved at the root in the list Reusable Content.

Reusable content can be anything you might need to reuse:
Once a piece of content has been added to the Reusable Content list, it can be added to a page by clicking the Reusable Content button in the ribbon and then choosing the item from the list.

Reusable Content items come with an interesting feature called “Automatic Update”. If you turn this on for an item and update the content, it will update everywhere the Reusable Content has been placed. this can be extremely useful in many places. In the following two examples, it must be turned OFF for the functionality to work correctly.
Image float left inserts an image with text possibilities into the page, floated left:
The default image is configured as a basic placeholder, giving the user something to click. Once the image is selected, you can choose a new image via the Replace Image option in the ribbon.

The texts can be replaced just by clicking on them and changing them to whatever the user needs. The texts also keep their formatting, as long as the user doesn’t delete too much of the reusable content item.
Configuration in Reusable Content List
Note: automatic update must be set to no.
Reusable HTML (remember to edit HTML source when editing):
<figure class="float-left box-story"><img alt="image" src="/Common-Image-Library/placeholder.jpg" _moz_resizing="true" style="width: 300px; height: 300px;"/><figcaption>
<header>Header for box story</header>
<p>“Box story body text”</p> </figcaption> </figure>
Sometimes the default unordered list in SharePoint is overly boring, even after styling it. The developers in this project came up with a much cooler way to display the content:
It’s a little fiddly in the implementation and later changes – adding something in between the current header 2 and header 3 is difficult, for example. However, when you are looking for a very stylized front-end website, it may very well be worth it.
This content actually consists of two pieces of Reusable Content: first, the Numbered List Item Wrapper is placed. Afterwards, the Numbered List Items can be placed into that wrapper.
Note: automatic update must be set to no.
Reusable Content HTML:
<div class="numbered-list">MARK TEXT and add reusable content numbered list ITEM</div>
When this is placed on the place, it simply shows the text shown in the div. To use it properly, select the text and then choose the numbered list item from the Reusable Content.
Selecting the text simply ensures that the actual list items are placed inside the list wrapper div.
Note: automatic update must be set to no.
Reusable Content HTML:
<div class="numbered-list-item">
   <div class="numbered-list-item-content">
      <header>Numbered item with header</header>
      <p>Body text for numbered list item</p>
   </div>
</div>
Add this Reusable Content item to the wrapper as described below, simply adding more bullets until there are as many as you would like that. Afterwards, edit the headers and texts to match what is required.
/* ------------------------------------------ */
/* NUMBERED LIST CSS */
/* ------------------------------------------ */
.numbered-list {
    counter-reset: numlist;
    border-top: 1px solid #CBC7C2;
}

.numbered-list-item {
    border-bottom: 1px solid #CBC7C2;
    padding: 15px 0 4px 1px;
}

.numbered-list-item:before {
    counter-increment: numlist;
    content: counter(numlist);
    -webkit-border-radius: 999px;
    -moz-border-radius: 999px;
    border-radius: 999px;
    width: 10px;
    height: 10px;
    padding: 8px 10px 12px 11px;
    background: #b4a76c;
    color: #fff;
    text-align: center;
    font: bold 14px/1 HelveticaNeueSerif, serif;
    font-size: 1.16667rem;
    float: left;
    margin-top: -5px;
}
.numbered-list-item-content {
    margin-left: 42px;
    padding: 0 0 0;
}
.numbered-list-item-content header {
    font: bold 15px/1.2 HelveticaNeueSerif, serif;
    color: #404040;
    font-size: 1.25rem;
    font-weight: bold;
    margin: 0 0 10px 0;
}
.numbered-list-item-content p {
    margin-top: 0;
}
I have rarely seen clients use the Reusable Content option. Occasionally it will be used to add a disclaimer to a page – but often that’s best placed in a page layout for a specific page type anyway. There just doesn’t seem to be much of a use for it, though I’ve always wondered if there could be a really useful application.
In a recent project, Daniel Gustafsson found two really cool uses for it: adding a floating image to page content and adding numbered bullet points which are highly styled. These are by far the most interesting uses I have ever seen for the Reusable Content, which is why I asked Daniel if I could share them with you here.
