
Nintex introduced task outcomes in Office 365 back in February 2015. That’s great- if you use task outcomes. Task outcomes are powerful functionality. However, if you don’t want to use the outcome block, there are ways to avoid it.

Nintex introduced task outcomes in Office 365 back in February 2015. That’s great- if you use task outcomes. Task outcomes are powerful functionality. However, if you don’t want to use the outcome block, there are ways to avoid it.

It’s common have a main item or document with associated tasks when working with a workflow. If you need a link from the task form to the main item form, perhaps to update the main item, here’s how to do it. This was tested on Office 365.

The standard outcome control on a Nintex flexi task form is a selection of the possible outcomes, either in a radio button list or a column of buttons. This is fine for many, many situations where the flexi task can be implemented, but sometimes you need to replace the outcome control on the Nintex Flexi task form.

I needed to hide the ribbon on a specific Nintex form. Yes, the client had heard my arguments about why you should keep the ribbon and decided to remove the ribbon regardless. Removing the ribbon from that one form did not turn out to be quite as straight-forward as I expected.
Note: this post is written specifically for SharePoint 2013.
Sometimes it is necessary to add a snippet of code to just one page. Examples could be:
There are technically a number of ways to achieve this:
Option #4 is my favorite for a number of good reasons:
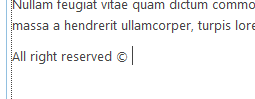
For this example, I will be using a simple JavaScript which shows copyright information, in this case from 2010 to the current year. This allows the copyright to be kept up to date:
<p>All right reserved © <script> var cur = 2010; var year = new Date(); if(cur == year.getFullYear()) year = year.getFullYear(); else year = cur + ' - ' + year.getFullYear(); document.write(year); </script> </p>
You can paste the code directly into the page content.

However, once you save the page and view it, you will see that SharePoint does not realize that it is code it needs to render in some way.
Conclusion: do not place code directly in the page content as it does not work.
In most content editor webparts and all rich text areas, there is a button in the ribbon called “Edit source”. This is great for quick fixes when content has gotten out of hand. In older versions of SharePoint, you could also use it to embed extra code.

You can easily paste your code straight into the Edit HTML window.
However, once you save, SharePoint lets you know that the code that it does not approve of has been stripped.

In this case, some of the embedded code has been stripped out.
Sometimes SharePoint will strip out all of it and sometimes it will only strip out parts which can cause an odd result. When it doubt, check back into the HTML source to see what has happened with your code and if it is still 100% intact.
Conclusion: while this used to work under some older SharePoint versions, it is generally not a reliable solution for SharePoint 2013.
SharePoint 2013 includes an Embed command in the ribbon which can be great for adding code snippets to your page:

After clicking the command, you are prompted to insert your code and given a preview:

SharePoint creates a Script Editor webpart on the page for you. It even includes an “Edit Snippet” button, so you can go back and edit the code later.

The JavaScript is being displayed correctly in the webpart and also on publishing the page.
Conclusion: in my experience, this works but is dependent on the complexity of the code. Test well before using.
I have saved the JavaScript into a file called copyright.html. The file extension can help SharePoint determine how to parse the code when it is called, but you may need to experiment depending on your code – I have had good results from using txt, html and js extensions in the past.
Here is the file in Notepad++:

In this demo, I uploaded the HTML file to the document library on the same site as the page we are working with.

Tip: I tend to use the following rules of thumb as to where to upload these kinds of files:
Next, place a Content Editor Web Part (CEWP) on the page and edit the webpart settings. At the top, add the link to the file and click “Apply” to save the changes.

The content should immediately display in the CEWP on the page.

Tip: if you wish to use the same webpart in many places, you could export the configured CEWP and import it as a custom webpart. You can then place it on a page and it will already be configured for you.
Conclusion: this is my favorite method due to the central storage of the files, ease of editing the files and reusability.
A client recently had the request to add the “Open in Explorer” link for a specific document library on a site. It’s understandable, considering that finding the Open in Explorer link requires understanding of the ribbon and knowing where to look for it; this site would be targeted at users with minimal SharePoint knowledge.
Browser considerations
Microsoft says that IE 7+ is required to use Open in Explorer. However, Microsoft also says that only IE 8+ is supported for SharePoint Online. Your mileage may vary.
I tested it in Chrome, which did not work. I have heard rumors that it works in Firefox, but that sounds unlikely to me, considering it is tapping into Windows functionality.
Troubleshooting Open in Explorer functionality
The functionality seems to be a bit sensitive and the conditions need to be just right for it to work.
Note #1: “Open with Explorer” may not work if you have the 64-bit version Internet Explorer and/or the 64-bit version of Microsoft Office installed.
Note #2: There are some issues with IE 10 and this functionality; I got it working with IE10 (32-bit) with the “keep me signed in” trick – see below for more information.
Typical error messages:
Solutions:
Creating the link
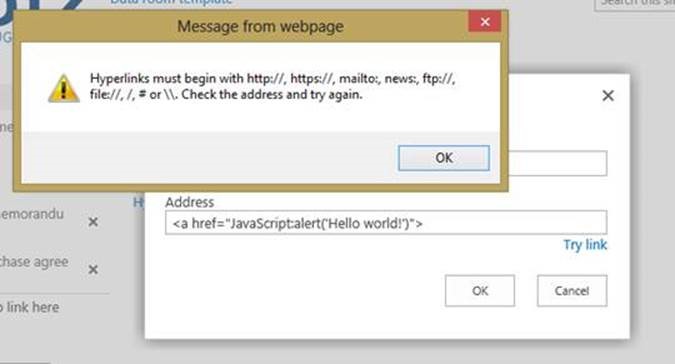
The Open in Explorer link in the ribbon is nothing more than JavaScript. We can quite easily build our own.
The basic format is as follows, for the URL https://example.sharepoint.com/template/Shared Documents/:
<a onclick="NavigateHttpFolder('https:\u002f\u002example.sharepoint.com\u002ftemplate\u002fShared\u0020Documents', 'blank');" href="#">Open in Explorer</a>
The NavigateHttpFolder function resides in the core.js file and is usually called automatically. It was a non-issue on SharePoint Online with (mostly) default branding.
Note that you need a \u002f for a backslash, and a \u0020 for a space.
In my example further on, I’ve made the link relative – it works both ways.
Making the link dynamic
The thing is, the cilent wanted a link that could be used on a site template for different projects. Each project has its own Shared Documents library, which I want to link to without having to change URL by hand. This is where I started to make it a little bit prettier:
<br /><script type="text/javascript">// <![CDATA[
var CurrentSiteURL = document.location.pathname.split("/").slice(1,2).toString();
var ExplorerViewURL = "\u002f"+CurrentSiteURL+"\u002fShared\u0020Documents";
var LinkText = "Open Shared Documents in Explorer View"
// ]]></script><br /><br /><a onclick="NavigateHttpFolder(ExplorerViewURL, 'blank');" href="#"><br /><script type="text/javascript">// <![CDATA[
document.write(LinkText);
// ]]></script></a> <br /><br />
I knew that the client would never have more than one level of project sites, i.e. a root site with underlying project sites. So, I grabbed the current URL, split it into an array based on where the forward slashes are and then just grabbed the site information, i.e. “template” from my previous example.
I used the CurrentSiteURL variable to build the URL for the document library. It made sense to make it relative, in case the base URL ever changes.
I put the link text into the variable LinkText, just to make it look nice when building the actual HTML link. It would also allow for a potential dynamic link text.
Link placement/usage
The client also wanted this Open in Explorer link in the quick launch navigation. When I tried this on SharePoint Online/SharePoint 2013, I got a nice error:
It turns out that there’s new security in the newer versions of SharePoint and you can’t add JavaScript to the menu anymore. At least, not without using real code, features and stuff that was beyond the scope of this project.
So I did the following:

Full code in OpenInExplorer.js
<script type="text/javascript"> <!-- Created by Hannah Swain, April 2013 https://sharepointhannah.wordpress.comUsing the “Open in Explorer” link on SharePoint 2013--> var CurrentSiteURL = document.location.pathname.split("/").slice(1,2).toString(); var ExplorerViewURL = "\u002f"+CurrentSiteURL+"\u002fShared\u0020Documents"; var LinkText = "Open Shared Documents in Explorer View" </script> <a onclick="NavigateHttpFolder(ExplorerViewURL, 'blank');" href="#"> <img style="height: 24px; width: 24px; border: 0px; padding-right: 5px;" alt="Open in Explorer" src="/Style Library/client/folder_yellow_explorer.png" /> <script type="text/javascript">document.write(LinkText);</script ></a> <span style="padding-left: 34px; font-style: italic;">Requires Internet Explorer 7.0+ and Active-X controls</span>
Credits
The following articles/forum threads helped me to figure this out:
