

The standard outcome control on a Nintex flexi task form is a selection of the possible outcomes, either in a radio button list or a column of buttons. This is fine for many, many situations where the flexi task can be implemented, but sometimes you need to replace the outcome control on the Nintex Flexi task form.
In this case, I needed to use completely separate buttons to control the flexi task outcome.
I tried very hard to get “Replacing A Decision Control with Save and Submit buttons on a Flexi Task” working, but I ran into too many JavaScript issues. Nintex is very cautious about offering support, as this is considered a custom solution. I had to find another approach and I chose to attach the “Save and Submit” buttons to the outcome control via out of the box functionality.
TL;DR – create “Save and Submit” buttons, choose the decision column for the “connected to” field and ensure that the value returned is the outcome numeric value.
Remember to remove the outcome control from the form, otherwise the form will throw validation errors.
Read on for my in-depth investigation on how to get this working!
The workflow
In this case, we are going to work with a very simple workflow called “Flexi test” which consists of a Flex task workflow.

The task is assigned directly to me and has two potential outcomes: approved and rejected.

The workflow itself is very simple. The interesting bit is in the task form.
The task form
The task form has hardly been modified, except to add three Save and Submit buttons. You can see the outcome control with the values “Approve and Reject” right next to the three buttons.

The buttons
There are three buttons as we are testing three different scenarios.
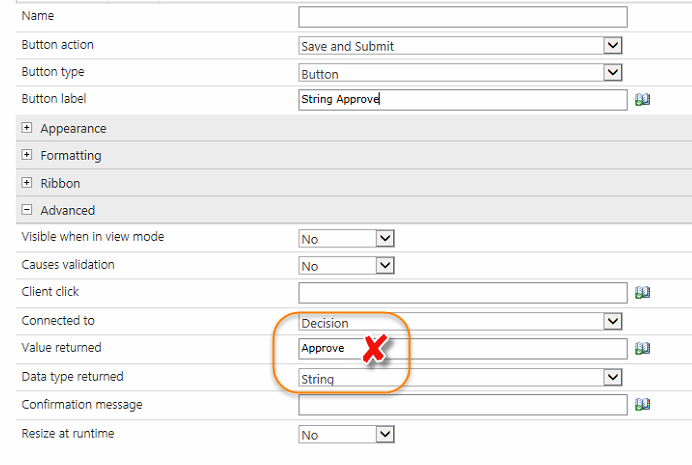
The buttons are simple to configure: ensure the button action is “Save and Submit”, validation should be no and it should be connected to a list column. In this case, we want to attach the button to the decision column.
The example below is the “String approve” button. It does save the form, but it does not affect the outcome. Directly referring to the outcome string value does not work.
The outcome numerical value
To affect the outcome, you need to use the numerical value of the outcome, not the string value. To find this value, you need to run the form “live”, i.e. the resulting form when you have run the workflow. When the live form is open, use the browser tools to check the numerical value of each outcome. If you try to check the values from the form preview screen, you only see the value of “-1”.
In this case, you can see that “Approve”has a value of 4 and “Reject” has a value of 5.

Integer vs. string: no difference
Back on the form, there are two buttons configured to set the task outcome to “Rejected” via the value of 5. One button is set up to return a string; the other is set up to return an integer. If you’re going to test, then might as well be through, right? I can go ahead and tell you that returning an integer or a string both work just as well.


To test the changes to the form, you need to do the following:
- Save the form
- Close the form
- Save the task
- Publish the workflow
- Run the workflow from an item in the list
- Open the workflow task item to see the form
Outcome control validation
When any of the buttons are clicked, they try to save and submit the form. As you can see in the result below, the outcome control is causing validation; as it is not filled in, the form cannot be saved or submitted.

According to Replacing A Decision Control with Save and Submit buttons on a Flexi Task:
On our Nintex Form, add a Decision Control, we will be using JQuery to hide this field (if you don’t want to use JQuery you can place it behind another control). Note that we can’t set this to Visible: No , because we will need the control rendered into the form.
For that reason, it took me a while to decide to try removing the outcome control. You need to remove the outcome control for this solution to work. The outcome control may be necessary for the JavaScript solution but it does not work when using Save and Submit buttons attached to the decision column.

You can see that the outcome control is also not visible on the live form:

Now, when clicking the buttons, the task has been completed (i.e. the button’s action saved the task and submitted it) and the outcome of the task is rejected.

Conclusions
If you want to make the buttons affect the decision column in the list, do the following:
- Create “Save and Submit” buttons,
- Choose the decision column for the “connected to” field
- Ensure that the value returned is the outcome numeric value.
- Remove the outcome control from the form, otherwise the form will throw validation errors
Have you gotten this working?

THanks for posting this – helped be to design a task form that more closely matches what my users expect (over teh default options).
However, I am unable to execute any validation on another field using the values being pushed to the “Decision” Task Column by the Save and Submit Buttons – is there something I am missing?
For example, having a comments box that requires an entry if someone clicks a “Reject” button but does not require an entry if they click an “Approve” button.
Any suggestions and/or sense of direction would be a huge help – thanks.
I’m not sure why that doesn’t work for you. You might have better luck on the Nintex forums – there are lots of people there who can help you troubleshoot further.
Hi, this worked well for my business need. However, I am unable to get a Confirmation Message (under Advanced options of the form) to execute. Do you have any ideas?
This post has been very helpful for me. Thank you very much.
I used the ‘calculated value’ from palette to find out the live numerical value of outcome.