

As part of a much larger case management system, a client wanted to have one form with multiple yes/no radio buttons. These questions act as gatekeepers: the user cannot proceed to the next question until the previous question has been answered.
Here’s the workflow that we’ll be working with. The main focus will be on the “Qualify case” section, in which each decision will be a question on the form.

List configuration
For this example, we are going to use a fairly simple case list. Best practice is to use site columns for a list like this.

Initial workflow configuration
Once the list is set up, you’ll need to create a new workflow. In this example, we’re working with a workflow called “Qualify case”. Within this workflow, create a workflow variable to store the form’s outcome:

I prefix workflow variables with “wfv-” – it makes it easier to find them when the workflow becomes more complex.
Start the workflow by adding a “Request Review” action. There are a few other task actions that you could use, but I find this one cleanest for this purpose. There is a great task comparison overview on the Nintex site. Don’t use the Flexi Task, as you will be required to use the Flexi Task’s outcome control. You can set up the Request Review action as follows:

Form configuration
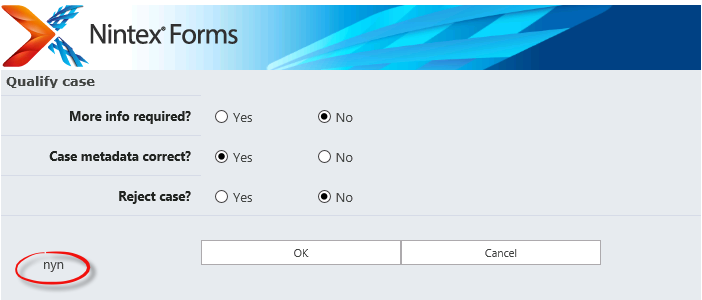
Next, we need to set up the Request Review’s task form. Here’s what the final form will look like:

For this example, add three option controls to the form. The most important thing here is that the name of the control is something logical. I named each control as Q1, Q2 and Q3. This makes it very easy to reuse the form, as the names are generic.

Once all three option controls have been configured and named, you can tie them together using a Calculated Value control on the form. This control is often used for adding up values, such as in a repeating section form. In this case, we will use it to calculate the form’s outcome. Make sure the Calculated Value control is connected to the workflow variable – the value of the control will be placed into that variable.

We need to configure the Calculated Value’s formula. To do so, create an if-statement (found in the Runtime Functions tab) such as “If(Q1==’Yes’,’y’,’n’)”. This means that if the value of Q1 is yes, then ‘y’ will be added to the Calculated Value’s output. If the value isn’t yes, then it will add ‘n’. You can do this for as many controls as you need to by adding a ‘+’ between each statement.
I did try this with nested if-statements, but didn’t manage to get it working. At one point, there was a form with five questions: the nested statements became very tricky to manage.
Note: Nintex Workflows and Forms are case-sensitive and work best with single quotes.

You’ll be able to see the value of the Calculated Value when previewing the form. You can see that the Calculated Value is reflecting the radio button values which have been selected:
If you have made any mistakes in your Calculated Value’s formula, you will be greeted with a white screen on previewing the form. To troubleshoot, check your formula for spaces, incorrect quotes, etc.

You can extend this form as far as you like with rules – here are some suggestions:
- Disable questions after the current question, i.e. If Q1!=’Yes” then disable Q2 and Q3
- Hide unnecessary information, i.e. the user should select a rejection reason when rejecting a case
Final workflow configuration
Once the Request Review form has been completed, the rest of the workflow can be configured. Add in a Switch action which evaluates the variable “wfv-outcome”.

We can evaluate the wfv-outcome string as follows:
- ynn = more information required
- nyn = correct metadata
- nyy = reject case
- nnn = continue
Admittedly, there’s a logic mistake in this demo: there is no action for when the metadata is incorrect. It was based on the customer’s solution where if the metadata was incorrect, the applicable metadata was then displayed in the form to be fixed on the spot. Therefore, it didn’t matter if the outcome for that question was yes or no.
Once the different branches of the Switch control have been determined, add in the actions for each branch.
Alternative solution to switch control
You could also create a workflow variable for each question and assign the variable to each option control on the form, the same way as was done for the calculated value control. Once you’re back in the workflow configuration, you would then use Run If actions to determine what to do.
I find the solution with the switch cleaner and more flexible for adding or removing questions as well as changing the order.
Loop versus state machine
We didn’t handle the loop where the case manager requested more information from the creator, then went through the qualify case workflow again. This could be solved using either a loop or a state machine control. You can read a good overview on Creating flexible, robust Nintex workflows.
