
SharePoint permission configuration is one of the hardest things for end-users to understand. Sometimes it is easier to explain a specific scenario instead of how the entire permissions concept works.

SharePoint permission configuration is one of the hardest things for end-users to understand. Sometimes it is easier to explain a specific scenario instead of how the entire permissions concept works.
")
I did a video/podcast with Modermodemet last week, concerning personal productivity (note: English and Swedish). It was a fun chat that covered your own personal assistant (Jarvis?) to how to manage multiple calendars.
During the conversation, I mentioned two things that seemed to make an impact:
This is a very simple example from my calendar:

I am running Outlook 2013 in this example, but I have been using this since Outlook 2007 or so. I know it got a little bit more complicated in Outlook 2010, so here’s an example for configuring appointments with “travel” in the subject to be a specific color.


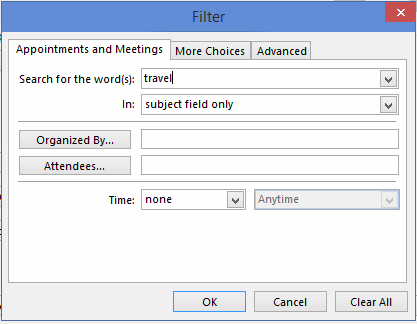

During the discussion, I also mentioned that my partner and I generally don’t share a calendar. For example, if we have a work obligation in the evening, we create an event and label it with either “H: event title” if it is me, or “F: event title” if it is him. Then we invite the other person to it. In my calendar, anything that starts with “F:” automatically is turned red so I know it is an appointment for my partner. It’s a very similar idea to the conditional formatting for the travel time.

This is such an easy thing to configure and the automatic colors make it so much easier for me to see what’s in my calendar at a glance.
Note: this post is written specifically for SharePoint 2013.
Sometimes it is necessary to add a snippet of code to just one page. Examples could be:
There are technically a number of ways to achieve this:
Option #4 is my favorite for a number of good reasons:
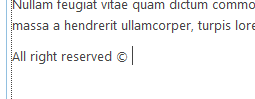
For this example, I will be using a simple JavaScript which shows copyright information, in this case from 2010 to the current year. This allows the copyright to be kept up to date:
<p>All right reserved © <script> var cur = 2010; var year = new Date(); if(cur == year.getFullYear()) year = year.getFullYear(); else year = cur + ' - ' + year.getFullYear(); document.write(year); </script> </p>
You can paste the code directly into the page content.

However, once you save the page and view it, you will see that SharePoint does not realize that it is code it needs to render in some way.
Conclusion: do not place code directly in the page content as it does not work.
In most content editor webparts and all rich text areas, there is a button in the ribbon called “Edit source”. This is great for quick fixes when content has gotten out of hand. In older versions of SharePoint, you could also use it to embed extra code.

You can easily paste your code straight into the Edit HTML window.
However, once you save, SharePoint lets you know that the code that it does not approve of has been stripped.

In this case, some of the embedded code has been stripped out.
Sometimes SharePoint will strip out all of it and sometimes it will only strip out parts which can cause an odd result. When it doubt, check back into the HTML source to see what has happened with your code and if it is still 100% intact.
Conclusion: while this used to work under some older SharePoint versions, it is generally not a reliable solution for SharePoint 2013.
SharePoint 2013 includes an Embed command in the ribbon which can be great for adding code snippets to your page:

After clicking the command, you are prompted to insert your code and given a preview:

SharePoint creates a Script Editor webpart on the page for you. It even includes an “Edit Snippet” button, so you can go back and edit the code later.

The JavaScript is being displayed correctly in the webpart and also on publishing the page.
Conclusion: in my experience, this works but is dependent on the complexity of the code. Test well before using.
I have saved the JavaScript into a file called copyright.html. The file extension can help SharePoint determine how to parse the code when it is called, but you may need to experiment depending on your code – I have had good results from using txt, html and js extensions in the past.
Here is the file in Notepad++:

In this demo, I uploaded the HTML file to the document library on the same site as the page we are working with.

Tip: I tend to use the following rules of thumb as to where to upload these kinds of files:
Next, place a Content Editor Web Part (CEWP) on the page and edit the webpart settings. At the top, add the link to the file and click “Apply” to save the changes.

The content should immediately display in the CEWP on the page.

Tip: if you wish to use the same webpart in many places, you could export the configured CEWP and import it as a custom webpart. You can then place it on a page and it will already be configured for you.
Conclusion: this is my favorite method due to the central storage of the files, ease of editing the files and reusability.
I was working on a document management system, where each client had its own site collection and projects were subsites under that site collection. I needed a way to show a list of available site collections from a main landing page. This needed to show all site collections, no security stripping and search rollup was not an option at this time. The easiest way then is to create a list that acts as a directory – just add the sites to the list manually.
The problem was the link to the sites. How best to do this?
Adding a hyperlink site column is easy. You get a clickable result in your field display.
The tricky part is dealing with the fact that a hyperlink column consists of two fields: the web address and then the description.
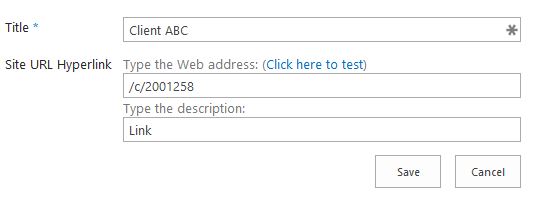
If you do not fill in a description, the URL is displayed when you view the item.

This approach has a few issues:
You can use a calculated column to display the link as an image, i.e. an arrow or something that is very obviously a link – how about something like this?
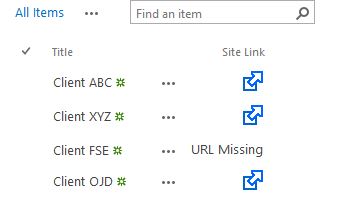
By choosing to use a calculated column, we have ensured that anywhere the column is used, the arrow will be displayed. This means that it will work in any view, any webpart, etc.
*** Update 2017-07-21: This worked on SharePoint 2013 and SharePoint Online until sometime this spring. When using SharePoint Online, it now only works in classic mode – it has been disabled in the new mode.

To replicate, follow these steps. The column names are not important, they are just suggestions.

The formula I used is as follows:
=IF(ISBLANK([Site URL]), "URL Missing", ("<a href="&[Site URL]&" target='_blank' alt='Open site in new window'><img src='/SiteAssets/link.png' style='height:20px; width:20px;' /></a>"))
Broken down, it has a few interesting elements:
Tip when editing formulae in calculated columns: use Notepad++, as it will help you see when brackets are closed. Just make your changes in Notepad++, then copy them into the edit column window each time – this will make it far easier to work with.

One of the coolest things about this solution is that generally, calculated columns cannot be rendered as HTML. Technically speaking, the contents of the column should just be displayed as plain text. Yet, here we are, with an nice arrow image being displayed and the link working beautifully. The trick is changing the returned datatype from single line of text to number. Once you do that, then the contents are rendered as HTML.
Credit for this solution goes to Danny Engelman at ICC – HTML in a Calculated Column / Field of a SharePoint View.
In the real world solution, both the Site URL and Site Link columns were site columns, attached to a content type called Client Directory. The columns were also reused for a similar construction in a Project Directory custom list, which showed the subsites under each client site collection. Using a content type hub, these columns were replicated to each site collection and we were able to build a similar Project Directory in exactly the same way: simply fill in the URL, display Site Link column. This made the solution incredibly flexible and reusable.
I’m currently working on a project where we needed to assign a priority to issues based on impact and urgency. You could always let users figure this out for themselves, but it’s much better to automate it when there are clear definitions for each value and a table which translates the impact and urgency to priority.
